6 Stretches You Can Do in 6 Minutes to Stop Your Knees From Cracking and Popping knee popping stretches
Are you hearing popping and cracking noises every time you bend your knees?
Chances are, your muscles and connective tissues probably just need a good stretch.
Why Do My Knees Crack?
Tired of sounding like Rice Krispies in milk whenever you stand or sit? Cracking and popping in the knees can be the sound of fluid getting pushed about or it can be something more serious involving bones and connective tissues.
Cavitation occurs when joints move and the synovial fluid changes pressure, releasing carbon dioxide bubbles. This is common and no cause for alarm.
Some people may also feel a grinding sensation in the knees when squatting; if it doesn’t hurt, it’s known as benign crepitus.
If you experience knee pain when sitting or squatting, however, there may be more going on.
Crepitus (the non-benign kind) occurs when cartilage rubs against the bones and tissues in the joint, eventually wearing the cartilage and causing pain upon movement, often a precursor to osteoarthritis. Strain or injury to the knee joint can result in tears in the meniscus (cartilage) or patellofemoral pain syndrome—pressure build-up behind the kneecap. These conditions should be reviewed with a medical professional.
To ease the harmless but sometimes disconcerting creaks in the knees, here are six stretches you can do to loosen and strengthen muscles and connective tissue to reduce the sound effects.
Six Stretches To Get Rid of Knee Popping and Cracking Noises
1. Calf Release
This exercise uses pressure to relieve muscle tension in the calves. Remember that all muscles in the body are connected to one another—calf muscles join the upper part of the leg at the knees.
To stretch:
Sit on the floor with a tennis or other firm ball under the top of the left calf. Lay your right leg on top of your left, crossed at the ankles. Place your hands flat on the floor however they feel most comfortable. With weight on your hands, roll your calf forward and back over the ball. If you find a tender spot, stop rolling and flex your left foot back and forth for 30 seconds. Switch legs and repeat as necessary.
Original article and pictures take dailyhealthpost.com site
Feeling weak in the knees is only a good thing when it’s over your latest Tinder date. Experiencing joint pain is an entirely different sensation—and one that’s not quite so magical.
Joint pain affects one in five Americans and is one of the leading causes of disability in the U.S. Along with leg, neck, and back pain, knee pain tops the list of problem areas, according to James Rippe, M.D., a cardiologist and joint pain specialist. And we're not getting better: A 2013 study reported a 162 percent increase in knee replacements over the last 20 years in people 65 and older .
So how do you know if you're at risk? Factors like inactivity, carrying too much bodyweight, poor posture, improperly treated injuries, and insufficient nourishment can all contribute to knee pain, Rippe says. Luckily, by taking better care of your knees throughout your life, starting as early as your thirties, you can strengthen joints and potentially save yourself from years of daily pain and discomfort.
What You Can Do Now
One of the best things you can do for knee health is simply maintaining an active lifestyle. “Your joints thrive on movement,” Rippe says. “Always try to remember that some activity is better than no activity.” Rippe recommends low-impact activities, like swimming, brisk walking, or cycling, and considering taking health supplements that provide glucosamine and chondroitin to strengthen and lubricate knees.
On the flip side, too much movement can be hard on your joints. So if you're one of those people who just can’t quit their HIIT habit or long-distance runs, there are some simple moves and stretches you can try that will help alleviate pain.
Since multiple muscles overlap the knee joint—including your calf, thigh, hamstrings, quadriceps, gastrocnemius, and soleus—and work together to flex, extend, and stabilize the knee, the exact source of pain isn’t always obvious. “This means you want to think about stretching all the tissues around the knees,” says Lauren Williams, a certified personal trainer and head coach at New York City’s athletic-based training studio Tone House.
Here, Williams shares six of the best (and simplest) moves that target all those muscle groups. Try to do these stretches after every workout to keep your knees healthy now and in the future.
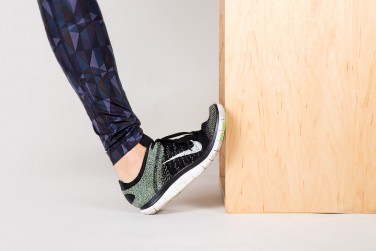
Wall Calf Stretch
Calf muscles often get neglected during our stretching efforts. However, for those who run, do high-impact workouts, or spend a lot of time on their feet, calf stretches are very necessary, Williams says. Calves can get extremely tight from impact and need to be stretched to relieve any pain that might travel up the knee.
Find a wall you can lean against. Facing the wall, flex your right foot and position your heel right where the floor meets the vertical surface. Your toes should be elevated, while your heel remains on the floor. Keeping your heel on the ground and your leg as straight as possible, lean toward your front leg, holding the stretch at its deepest point. Lean in for five seconds at a time before releasing, working to deepen the stretch. Repeat the same stretch with your left leg. Aim for 10 to 15 reps on each leg—or more, if you’re still experiencing tightness.
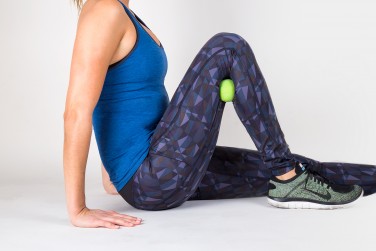
Calf Smash
This move allows you to work out tension in both your calf and your hamstring, Williams says.
Sit on the ground and pull your right foot close to your butt so your knee is bent. Wedge a lacrosse ball (or yoga/massage ball) below your right knee, sandwiching it between your calf and hamstring. Create a “compression force” by pulling your shin toward you, then rotate your foot in alternating circular movements to help create space in your knee joint. Continue until you feel tightness in these areas being relieved, then switch legs.
Half Kneel Hip and Quad Stretch
This stretch not only feels amazing, but it also works double-duty for your hip and quad muscles, Williams explains.
Kneel on one knee (feel free to put down a towel or mat) with your other foot planted flat on the ground in front of you. Make close to a 90-degree angle with both of your legs. Lean forward toward your front leg, stretching the front of your hip downward. Next, grab the ankle of your leg planted on the ground, and pull it toward your rear for a deep hamstring and hip stretch down the front leg, all the way to your knee. Move in and out of this stretch for 10 to 15 reps or more, depending on your level of tightness.
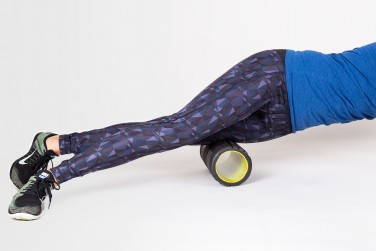
Quad Foam Roller Stretch
Stretching your quads is vital, as they get adaptively short from all the sitting most of us do every day and are often under constant tension. To get this large muscle group back to functioning at its best, Williams suggests using a foam roller.
Lie facedown and with a foam roller under your right leg, right under your quad. Put the majority of your bodyweight on your leg, and roll slowly. Instead of simply rolling up and down, roll your leg from side to side too, focusing pressure on the tighter spots of your muscles. Switch legs. Continue rolling until this feeling is no longer painful. If that’s impossible (as it might be for some runners!), do it for at least five minutes.
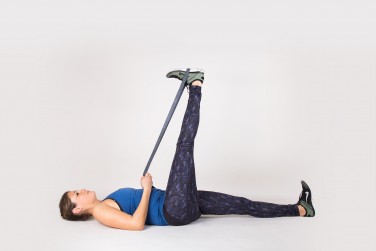
Wall Hamstring Stretch
Our hamstring muscles affect the knee more than we think and can be the source of discomfort or pain.
Lie faceup with your left leg flat on the ground, foot flexed. Take your right leg and prop it up on a wall or table, or use a resistance band. This stretch should radiate down the back of your leg, beginning in your knee. Once you find the deepest point of the stretch, alternate in five-second sequences between contracting and relaxing the foot of your right leg. If you have greater flexibility, hold the ankle of your right leg and pull it toward you. Aim for 10 to 15 rounds of five-second holds, and continue if you still feel tight. Repeat with your left leg.
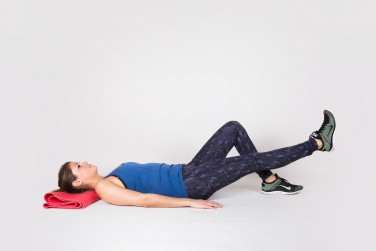
Straight Leg Raise
Easy strengthening exercises, like leg raises, put little to no strain on your knee but also activate and strengthen quadriceps.
Lie faceup with one knee bent and the other leg the ground in front of you. Lift your straight leg up approximately one foot, rotating your leg outward (the entire leg rotates outward, so toes point on a diagonal instead of straight up to the ceiling). Do 3 sets of 10 to 15 reps, alternating legs. As you get stronger, add ankle weights up to 10 pounds.
Original article and pictures take greatist.com site
In a society so concerned with building self-esteem, we often get it completely backwards.
You don’t build self-esteem by praise and flattery. This actually breeds entitlement and selfishness. Instead, self-esteem is built by teaching responsibility and a sense of accomplishment. [Tweet this.]
This thought, as well as those that follow, were shared recently by Colleen Hoffman at a ladies small group meeting. I am so thankful for her wisdom and the fact that she is allowing me to share it with you through this post. In her lesson, she referenced the article “What Really Happens When We Give Kids Everything They Want,” and the warning signs found below are derived from that article. Please check it out – it’s fantastic.
What we have to realize is that teaching responsibility begins at home. It is our responsibility to teach our kids to be responsible. And while we’d all like to think we’re doing a great job, there are some common pitfalls we need to be aware of.
You always give them what they want when they want it. This is very dangerous and has devastating consequences. Children who always get what they want start to believe that they deserve everything they want. That they are entitled to it and shouldn’t have to work for it. How are they going to learn the value of delayed gratification if they never experience the thrill of waiting and working for something?
You want them to have the life you didn’t. Lots of us grew up in less-than-affluent homes. And maybe now that we have experienced some financial success we want to give our kids all the things our parents couldn’t afford. But when we constantly lavish extravagant gifts on them, they stop appreciating the small things. In fact, they often stop even appreciating the big things. In the end, our kids need the gift of learning gratitude and responsibility more than they need iPods, cars, lavish parties, and perfect wardrobes.
You’re afraid to say no. Sometimes we’re afraid to say no to our kids because we’re afraid of the backlash. When they’re young, we’re afraid they’ll throw a temper fit in the store (ah, I’ve already experienced this one!). And when they’re old, we’re afraid they’ll sulk or rebel or think we don’t love them. But we cannot allow our fear to keep us from doing what is best for them – and sometimes that’s saying no.
You want them to fit in with their peers because you’re afraid they’ll be different. We cannot try to keep up with the Jones’s – and make sure our kids keep up with the Jones’s kids. Are we buying them things so that they can impress others? So that they’ll fit in? So that we can feel good about ourselves? We really need to check our motives in this. Fitting in is not the goal. Raising responsible kids who will shine amongst their irresponsible peers should be.
You feel it’s easier to just give in. When we give in and just give our kids what they’re begging for – or stop making them do the chores they’re whining about – we teach them a dangerous lesson. We teach them that if they whine and complain enough, we’ll give in. It might be easier in this moment, but it will not be easier in the long run.
You want to protect them from failure. When we always bail them out and insulate them from their own failure, we teach a pattern of irresponsibility. How can they learn from their mistakes and poor decisions if they never experience the natural consequences? So maybe next time they forget their homework we shouldn’t be so fast to run home and get it for them. Maybe they’re better off suffering the small consequences now instead of the large consequences that will result from their still being irresponsible when they enter college and the workforce.
So how do we teach our kids to be responsible? We need to shift the responsibility to our kids.
We need to stop making it our responsibility to clean up their toys, make their bed, and ensure they have everything they need for school. These things need to become their responsibilities. Instead of yelling, begging, threatening, and nagging, we need to simply give consequences when needed. Here’s the plan….
How to Teach our Kids Responsibility
Have a plan. Let’s say our teenager struggles with being ready to leave on time. Have a plan and clearly explain it. “If you are not downstairs ready to go by 7:15, you will have ____ as a consequence.”
Follow through consistently. Once the plan is in place, follow through. If they’re not downstairs by 7:15, the consequences must go into effect.
No nagging, threats, or yelling. We’re trying to make it their responsibility, so no nagging and no threats. If they forget, we won’t yell. We’ll simply administer the consequences.
Don’t rescue repeat offenders. The first time they’re running late and forget their lunch maybe we should have some mercy and run back and get it. But if it keeps happening, we need to stop rescuing them.
Remain unemotional. If they argue and complain, don’t get hooked. You are doing what is best for them – even if they may not understand.
Show empathy not anger. Refrain from spiteful comments like, “Too bad you forgot your lunch! If you would’ve gotten your lazy tush out of bed earlier, you would’ve had time to go through your checklist.” A sympathetic comment will go much further while still enforcing the lesson. Try “I understand you are sad that you won’t have your lunch today. Next time you need to get up on time so that you’ll be more clear-headed and able to remember it.”
6 Sciatica Stretches That Will Loosen Up All The Right Muscles For Hip And Lower Back Pain Relief sciatica stretches
1. Camel Pose
Muscles stretched: rectus abdominus and external obliques
Kneel on the floor with your lower legs at hip width and straight behind you, your feet flexed (a yoga mat or thick towel under your knees will make it easier).
Place your hands on the bottoms of your feet and while pushing your shins to the floor, raising your hips up and forward. If you can’t comfortably reach the bottoms of your feet, place your toes on the floor, lifting the heels up and place your hands on your heels.
Keep your head up, your face toward the ceiling.
Stretch as far as is comfortable without compressing the lower back. Hold the pose for 30 to 60 seconds.
2. Wide Forward Fold
Muscles stretched: adductors. This and the frog pose below open the hips and stretch the inner thighs, increasing mobility and preventing lower back strain.
Sit on the floor (on yoga mat or thick towel) with your legs out to either side to form a 90° angle. Knees should be parallel to the ceiling.
Bend knees slightly and keep your spine straight. Stretch your feet with toes toward the ceiling and press through your heels.
Reach for your feet with both hands as you slowly straighten your legs and lean forward. If you can’t reach your feet, place your hands as far forward on your legs as you comfortably can. Bend at the hips and maintain a long torso.
When you feel the stretch in the backs of your legs, hold the position for 1 minute. Round up to the starting position.
Slowly widen your knees until you feel tension in your inner thighs and groin.
Lower your forearms to the floor in line with your torso, while keeping your back straight. Keep the insides of your calves and feet in contact with the floor, ankles in line with your knees. Flex your toes.
Look forward and hold the stretch for 30 seconds. Push toward the floor with your hips to optimize the stretch.
4. Wide Side Lunge Pose
Muscles stretched: adductors and hamstrings. This stretch opens the hips and the backs of your legs, through which the sciatic nerve runs.
Start with both feet facing forward in a wide stance, keeping your legs straight.
Walk your hands to your right foot while bending your right knee and rotating your left foot so that the toes are pointing toward the ceiling. Make sure your right foot stays flat on the floor and your right ankle is in line with your right knee.
Hold for 30 seconds, round up, and repeat on the opposite side.
5. Butterfly Stretch
Muscles stretched: adductors
Sit on the floor and place the soles of your feet together, keeping your back straight.
Press your knees down toward the floor with your hands to engage the stretch.
Hold for 30 seconds and release. Repeat as many times as is comfortable. For a deeper stretch, bring your feet closer to your body.
6. Forearm Extensor Stretch
Muscles stretched: forearm extensors. Wait a minute…aren’t these supposed to be stretches for the lower back? Remember, strength and mobility of the entire body support the lower back when it comes to the practicality of lifting, carrying, and whole-body movement. Strengthening your arms allows stress of weight-bearing to be more dispersed to ease strain on the lower back.
Stand with back straight, chest out, and feet shoulder-width apart.
Extend your left hand in front of you at shoulder height, palm down.
With your right hand, cover the back of your left hand and gently pull down the left hand.
Press your left hand towards your body with your right hand.
Hold stretch for 30 seconds, then release and switch hands.
A few things to keep in mind when doing these or any lower back stretches.
1. Stretching doesn’t replace the need for all-around exercise. Regular aerobic and resistance training exercises tremendously decrease the risk of lower back pain.
2. Under certain conditions, stretching may actually exacerbate lower back pain. Inflamed vertebral discs or nerve impingement in the back or legs contraindicate some stretches. (5) Consult a kinetic healthcare provider (i.e., physiotherapist, massage therapist, kinesiologist) before engaging in stretching if you suffer from one of these conditions.
3. Chronic lower back pain hurts and is serious in that context but it is rarely the reflection of a life-threatening condition. Once the source of the problem is determined, a practical exercise and diet regimen can alleviate and even eradicate the pain. Whether the cause is simple (like posture) or more complicated (like a herniated disc), pain will often dissipate when you know and remove the cause. (6)
Original article and pictures take dailyhealthpost.com site
I once asked a colleague who has coached many runners to collegiate and Olympic glory what he considered the proper mileage totals to succeed in distances from the 5K to the marathon. “That’s easy,” he said. “You want to run as few miles as you can and still win.”
Runners too often get caught in the mileage trap, thinking more is better. The truth is, more mileage is better only up to the point where you can achieve your potential. After that, each additional mile only increases your injury risk. The following six rules informed the mileage ranges below and can help you find your magic number.
6 Reasons to Stop Working Out fattributes: “Pasta with Asparagus, Mushrooms, and Prosciutto ” falseknees: “Scarlet fever ” the-exercist: “ 90-Degree Squat Jumps “ Stand with your feet hip-width apart, holding a medicine ball. Squat down and tap the ball lightly on the floor. Jump up out of your squat, rotating your body midair 90 degrees, landing in a squat, and tap the...
Stand with your feet hip-width apart, holding a medicine ball. Squat down and tap the ball lightly on the floor. Jump up out of your squat, rotating your body midair 90 degrees, landing in a squat, and tap the ball on the ground. Continue rotating until you land back into your starting position, and then repeat on the other side. Try one full circle to the right and one to the left.
Don’t have a medicine ball handy? Grab a dumbbell or just reach your arms instead.
Single-Leg Donkey Kicks
Start on all fours with your knees under your hips and hands under your shoulders. Keep your left knee bent at 90 degrees, flex your right left, and lift your left knee to hip level. Engage and lift from your butt. Lower your leg and stop when your knee is about an inch off the floor.
This article on fibromyalgia pain relief devices was originally published on NationalPainReport.com. It is being republished here with permission from the editor. This post contains affiliate links.
6 pain relief devices for fibromyalgia | Fed Up with Fatigue
Pharmaceuticals haven’t been very effective in relieving my chronic pain from fibromyalgia and Lyme disease, so I am constantly on the hunt for non-drug therapies to help myself and my fellow fibro warriors.
A few months ago, I shared my experience with the Quell wearable pain relief device, and I still use it pretty much every day with good results.
Yeah, I know the idea of using some sort of device to zap away your pain might sound too good to be true – I was a huge skeptic myself before I started using one of these gadgets myself – but I’ve learned from personal experience that pain relief devices can be extremely useful tools in managing fibromyalgia. So, I thought it might be helpful to take a look at some of the devices currently on the market and how they might help in the battle with chronic pain. Below are a few of the more popular options available for purchase online.
AVACEN 100
What is it?
AVACEN 100 | 6 Pain Relief Devices for Fibromyalgia
The FDA-cleared AVACEN 100 uses the AVACEN Treatment Method, an entirely new concept in pain treatment by noninvasively and safely infusing heat into the circulatory system to create muscular relaxation while increasing microcirculation throughout the body. Unlike other medical devices providing local pain relief, the AVACEN 100’s unique mechanism of action provides temporary relief of minor muscle and joint pain and stiffness; the temporary relief of joint pain associated with arthritis; muscle spasms; minor strains and sprains; and muscular relaxation. It is a drug-free and safe alternative for relief of muscle and joint pain.
How can it help fibromyalgia?
CE approval for the treatment of fibromyalgia in the 28 European Union countries was based on AVACEN’s very promising 22-person fibromyalgia study, in which all patients reported positive results. The AVACEN study was conducted under a cooperative research development agreement with the U.S. Department of Veterans Affairs at the University of California San Diego Center for Pain Medicine, Perlman Medical Center and the VA Medical Center, San Diego.
The Society for Neuroscience 2013 Annual Meeting abstract program disclosed that the 28-day AVACEN follow-up study produced a statistically significant reduction of more than 40 percent in the widespread pain index and a reduction in average tender point counts from approximately 15 to 9 (11 is used for clinical assessment).
Where to purchase? Price?
The AVACEN 100 can be purchased at AVACEN.com for $2,595. Financing is available through PayPal Credit and TimePay.com. The device comes with a two-year warranty.
Return policy?
AVACEN Medical offers a 100% money-back, 30-day guarantee if you follow a clinically proven effective protocol of a twice daily 15-minute treatment.
Home ultrasound
What is it?
UltraCure PRO Plus 1Mhz Portable Home Ultrasound Therapy Machine | 6 Pain Relief Devices for Fibromyalgia
Home ultrasound is simply therapeutic ultrasound therapy that can be administered in the home. The real strength of ultrasound is the ability to reduce inflammation, which is an enemy to healing. By helping to reduce inflammation, it allows the body to heal naturally.
During ultrasound therapy, a handheld transducer will generate high frequency sound waves that penetrate deeply into the tissues with the aid of an ultrasound gel. Most home ultrasound therapy machines will be handheld and have a rounded crystal probe head. After applying ultrasound gel, the ultrasound head should be moved in small circular motions during treatment. The handheld ultrasound transducer emits ultrasonic waves that travel through the body causing micro-vibrations in the tissues of the body. These vibrations heat tissues, such as tendons, ligaments and muscles, promoting blood flow at the injury site. This increased blood flow is the main aim of ultrasound therapy because it allows large amounts of nutrients and oxygen to reach affected cell tissues
The most common frequencies of ultrasound machines are 1 Mhz, 3 Mhz and 5 Mhz. The 1 Mhz machines will actually penetrate deeper into the body, up to 1.66 inches and is most often used for therapeutic purposes. Both the 3 Mhz and 5 Mhz machines do not penetrate very deeply into the body and are more limited in their treatment scope. Some of the more common uses of ultrasound include joint and arthritis pain, plantar fasciitis, heel spurs, bursitis of the shoulder, knee, achilles, elbow or hip, tendonitis of the shoulder, knee, achilles, wrist, forearm and biceps, tennis/golfer’s elbow, carpal tunnel/tarsal tunnel syndrome and strains/sprains/pulled muscles.
How can it help fibromyalgia?
Ultrasound users with fibromyalgia report mixed results. Some people have an improvement in symptoms, and others do not. (As we all know, what works for one of us doesn’t necessarily work for all of us.)
Where to purchase? Price?
Home ultrasound machines can be purchased at EZUltrasound.com ranging in price from $99.99 to $139.99. There is a five-year warranty on machines.
Return policy?
There is a 60-day money-back guarantee as long as the machine has not been damaged. The unit must arrive at EZUltrasound at least two to three days before the 60-day period is up for processing.
Oska Pulse
What is it?
Oska Pulse is a small, portable, hands-free device that safely optimizes Pulsed Electromagnetic Field (PEMF) therapeutic technology, a longtime therapy used by medical practitioners to help people live a more active, pain-free and drug-free lifestyle. Oska Pulse is a smart, safe, easy-to-use, wearable health technology product designed to help reduce muscle stiffness, temporarily relieve minor pain and increase mobility for people who suffer from chronic pain. Oska Pulse provides pain relief by promoting the body’s natural recovery processes. People of any age with pain due to injury, surgery or trauma can benefit.
How can it help fibromyalgia?
It’s recommended that you use the device four to six times a day for half an hour. The Oska Pulse is very easy to use. You simply wrap it over the area you want to target, push the button, ensure it beeps and lights up, and the device does the rest. You can wear the Oska Pulse over your clothing and still feel the effects of it. Oska Pulse is a non-invasive alternative to opioids and other prescription drugs
Where to purchase? Price?
You can purchase Oska Pulse at OskaWellness.com. The cost is $399.
Quell is a wearable pain relief device that is 100 percent drug free and delivers widespread relief from chronic pain. Quell is designed to be worn one to two inches below the knee and works by stimulating the cluster of sensory nerve fibers located there close to the surface of the skin. Because the stimulation triggers your body’s natural pain blockers to provide widespread pain relief, you do not have to have the device on the area of the body where you are experiencing pain in order to experience pain relief. Quell is FDA cleared for 24/7 wear, so you can experience pain relief day and night. The product consists of a device, a sports band and an electrode.
How can it help fibromyalgia?
Quell is a great fit for widespread pain conditions because the device is powerful enough to trigger a widespread pain relief response versus a local pain relief response. Many people with fibromyalgia report good results with Quell.
Where to purchase? Price?
Quell is available for purchase at QuellRelief.com and at select retailers and healthcare provider offices. A Quell Starter Kit is $249, and a one-month supply of two replacement electrodes is $29.95. There is a two-year warranty on all Quell devices.
Return policy?
There is a 60-day money-back guarantee.
TENS
What is it?
Transcutaneous electrical nerve stimulation (TENS) is the use of electric current produced by a device to stimulate the nerves for therapeutic purposes. TENS, by definition, covers a complete range of transcutaneously applied currents used for nerve excitation although the term is often used with a more restrictive intent to describe the kind of pulses produced by portable stimulators used to treat pain.
TENS can provide pain relief from arthritis, tendonitis, headaches, migraines, nerve disorders, plantar fasciitis, tennis elbow, golf elbow, post-labor pain, neuropathy, carpal tunnel, calf injury, back and neck pain, sciatica and fibromyalgia.
The TQ Solo™ is a cordless, ultra-portable device that generates different forms of light (both laser and medical grade LEDs), which stimulate the body’s own repair processes when applied to an injured area. When our cells are exposed to varying colors of light (such as red, blue or infrared), it triggers the production of ATP, or cellular energy, that in turn can be used to repair the damaged cell. The TQ Solo™ has both red and infrared light to create a phototherapeutic effect, resulting in a reduction of pain, improvement of function or resolution of an injury.
Lasers, like the TQ Solo, are used in medical facilities around the world to treat acute pain, tendinitis, muscle strains, joint sprains, arthritis or bursitis. Research studies are ongoing to show how light may improve memory, heart disease and even autism.
While many lasers generate heat, the laser in the Solo has been “super pulsed.” This prevents the laser from heating up the tissue, so it will not harm the tissue like a surgical laser would. Users may feel a very mild warmth to the skin or no sensation at all.
How can it help fibromyalgia?
The TQ Solo can help to reduce the tender points associated with fibromyalgia by relaxing the muscle fibers. This reduces overall pain, but more importantly, the laser has been shown to protect muscles from injury when used before activity. Therefore, the daily morning use of the laser will actually help reduce the severity of fibromyalgia symptoms over time and even help to minimize pain after daily activities.
Where to purchase? Price?
The TQ Solo can be purchased at MultiRadiance.com. Multi Radiance Medical’s at-home lasers range in price from $1,995 to $2,495. There is a two-year warranty.
Return policy?
Products can be returned within 90 days of purchase.
Now it’s your turn…Have you tried any of the pain relief devices mentioned above? Are there others you would add to the list? Please share in the comments so we can all learn from one another!
Each week, FedUpwithFatigue.com covers the latest news, research and practical tips to help you live better with fibromyalgia and ME/CFS. If you liked this post, sign up for updates below!
Original article and pictures take fedupwithfatigue.com site